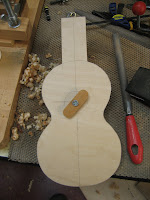


1. Today I popped the soundboard and sides out of the mold. This was done with a gentle tap with a small rubber mallet.
2. Then soundboard edges are routed off at the router table. Be careful of the grain direction so wood does not chip out.
3. The uke is then sanded with an orbital sander being very careful to sand perpendicular to the uke. The orbital sander can cut quick and you don’t want to round off the edges where you may want to add binding later or sand the sides or soundboard too thin in general.
4. Clean up the inside of the uke by popping off any glue beads that may still be lurking with a gouge chisel. This is the chisel that looks like a spoon.
5. Mike takes his paper template of his sides that has a general shape of the dome that he would like his concert ukes to be and draws with pencil the shape onto the sides. At the upper bout it is approximately 2 3/8”, the lower bout is about 2 5/8” and at the higher point a little behind the waist area is 2 ¾”.
6. Sand down to the pencil line with the belt sander.
7. Now take the uke over to the 12’ sanding plate and sand the top of the sides (where the back will eventually be glued on) on the dish. Think of it as two sections. The upper bout and the lower bout. Sand the head and tail blocks so they are flush with the sides. A felt tip pen or pencil can be drawn on top to see when everything is flush if you like.
Measure sides periodically to see if you are right on.
8. Put uke onto a holding board jig ( board in the shape of the uke with a screw and a scrap of wood to go through soundboard of uke to hold uke in place while working on) and glue on back kerfing flush or a tad higher than sides with the special clothespins.
9. After that is dried, (at least 20 min.) again take over to the 12’ sanding plate and sand until everything is level.

No comments:
Post a Comment