


The soundhole was re-inlaid and completed.
1. Sand soundboard to 70 thousands of an inch through the drum sander. (You need at least100 thousands to do the rosette).
2. Making the soundboard patches- The soundhole patches are made by routing out circles a little larger than the circumference of your soundhole on a large sheet of thin Mahogany. Do not go all the way through. Stop a little short of going all the way through. Now take the board with the cut circles to the drum sander and put through sander. The circles will pop off. This way you won’t get any chip out on the back.
3. Glue the circle soundhole patch onto the back (of course!) of the soundboard. It is clamped into a go-bar deck type arrangement with a fancy caul that Mike created. He takes a square of ¾’ plywood that just covers the soundhole patch and notches the center lines into it. That way he can line up the vertical grain line of the soundboard patch with the vertical grain lines in the soundboard. This of course can also be made of Plexiglas. He has put a drill bit through the center of the caul so a little of it protrudes through the other side which will go into the hole drilled into the center hole of the soundhole. Go-bar clamps are just pieces of 3/8” dowel rounded on the ends. Nothing fancy here! And works perfectly. The dowels have plenty of spring-back to accommodate several different thicknesses of material. No need to raise and lower the upper deck!
4. The bridge patch is approximately 1 ¼” x 5”, made of mahogany with the grain orientation perpendicular to the vertical grain of the soundboard. Bevel the bridge patch to take off any stress points (sharp edges) on the ends. If you don’t the points on the bridge patch can create spits in the soundboard later on in the life of the ukulele. This is done on the sanding belt. Make it look like a tongue depressor. You can also bevel the long edges of the patch at this time also.
5.Marking the soundboard- Take the outside Plexiglas template and mark the two horizontal lines where the upper and middle braces will lie. On the soundhole patch mark where the soundhole cut will be made. Do this at the top of the patch and at the bottom. Measure 5/8” from this mark and that is where the brace should lie. Draw the horizontal lines to indicate where these braces should go. Also, at this time mark the outside perimeter line of the final uke shape and where the two fan braces should go. Mike explained to be how we are trying to create two separate vibrating areas on the ukulele. I had always let the top of the fan braces touch the middle brace but Mike explained how that would create a deadened space that didn’t need to be there. The ukulele soundboard should be able to vibrate at the upper and lower bouts together but independently of one another. Also, he tells me no need to add the center brace like I had done in the past. Why add more wood than is needed? It is not needed for more strength and without it the soundboard can vibrate more. Fan brace marks are eye-balled laying a ruler at the top of the center line (top of uke) and angling it downward in-between center line at lower bout and side of uke. Repeat on other side. Like I said, just eye-ball it. Also, mark where bridge should be.
6. Bridge patch is then glued on using the go-bar deck and dowels for clamps.
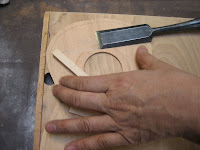
7. After the soundhole and bridge patch is glued on the soundhole is cut out. This is done on the drill press with a circle cutter.
8. Now hand-sand the back side of the soundboard with 150 grit paper to get rid of any left over glue, to round sound hole so that the rim of showing wood next to the rosette is even in case the circle cutter didn’t exactly cut the circle evenly and any rough edges. Finalize with 220 grit paper.
9. Cut off the top off of the soundboard patch where the horizontal braces will go. We do this with a small razor saw to the glue and then take a wide flat chisel to lift off the wood. Repeat at the bottom of the patch to expose wood to glue mid-brace.
10. Cut upper and lower brace stock about the same distance as the uke outline. Mark upper brace #1 and mid-brace #2. You don’t want to inadvertantly glue the shorter brace to the upper brace position. The brace material is approximately ¼” x 3/8”. Upper brace is swiped onto a flat sand-papered surface to make sure it is flat and mid-brace is arched by sanding onto a 30’ radius sanding plate to create a slight curved surface.

No comments:
Post a Comment