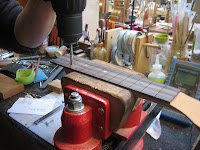


Today we will finish the fretboard by installing the frets and dressing them. The end of the fretboard is designed and peghead inlay is routed out and inlaid.
1. Take rectangular scraper blade and line up in fret slot where your tack is seated. Tap scraper with a small hammer so tack goes into neck.
1. Take rectangular scraper blade and line up in fret slot where your tack is seated. Tap scraper with a small hammer so tack goes into neck.
2. Place neck into vise and measure and mark where your position dots will lie. I have mine at the 3rd, 5th, 7th, 10th, and 12th fret positions. Center punch positions.
3. Measure position dots (if you don’t know) with a caliper and find a drill that will match your dots. Neck is held in a vise, positions are drilled, dots are placed and then CA glue is applied and then sprayed with activator. Neck is taken over to the sanding board and sanded until the dots (or position markers) are flush.
4. Mike then uses an orbital sander and sands the fretboard with 220 grit, then 320, then hits it with 1500 for a nice smooth finish.
5. I then made a pattern for the end of my fretboard by taking a piece of paper the width of the end of the fretboard and folded it in half and then drew a design and then cut (like paper dolls) the design out and rubber cemented it to where I wanted the fretboard to end. After a little drying, the cut out the line with a jewelers saw and sanded and finished the end.
6. The frets are then installed by trimming to size a little over what is needed and I just hammered in positioning neck on my leg and tapping in fret. Ends are cut with a fret end nipper. Cut the ends off as you go. A couple of my slots were a little wide so Mike showed me a neat trick. He dabs CA glue onto a very little plastic tubing (really small) and just touches the end of the fret with it. This technique only puts maybe a half of a drop of glue into the fret slot.
7. Mike then shows me how to dress the frets. A wide mill file is slid over the whole side of the fretboard very gently just getting the fret tangs. Then the sides of the frets are beveled either using a mill file or using a homemade or bought beveler. Mike’s is a block of wood with a slot at the angle you want and a file stuck into it. Then go over the bevels with a rubber block of 400 grit sandpaper. He then takes an offset diamond fret file (Stewart Macdonald #300) and goes over the tops of the beveled edges. A fret end dressing file (# 1175 Stew Mac) is used next running it over one side of the beveled edge. Just one light pass is needed. You don’t want to use too much pressure and create another burr. Go down one side of the fretboard, going from the first fret down to the next doing the upper side. Then do the same going up but on the other side of the bevel. This way you save time and assures all frets are covered. Of course, the touch test is the best thing to do to insure all frets are smooth. Then the little outside corners are filed using the same file.
8. Fretboard is then leveled with a long straight board with sandpaper glued to it. Just a light pass is needed.
9. Frets are then gone over with a 3200 polishing paper.
10. At this point Mike goes over the whole neck with an orbital sander with #320 sandpaper and gets out all file marks. He passes over everything; the back of the peghead, the whole length of the neck and the heel. He says if you do this the neck is done and all scratches are taken care of so that when you go to apply finish no scratches are to be seen.
11. Ebony peghead veneer is glued on right up to the fretboard “0” fret. It is clamped in a vise and left to dry. The sides are then sanded flush to the sides of the peghead and Mike sands the curved part of the peghead on the round part of the belt sander.
This neck of mine is ready to take home and finish cutting out the ebony at the top of the curved peghead and inlaying my orchid into the peghead.
This neck of mine is ready to take home and finish cutting out the ebony at the top of the curved peghead and inlaying my orchid into the peghead.

No comments:
Post a Comment